About
LightScythe is a two meter long stick to draw pictures into the air while taking a photograph using long time expsoure. The two meter stick has LED’s on it which light up to draw the picture column wise.
 |
 |
| Aus LightScythe |
My LightScythe is based on The Mechatronics Guy‘s implementation. Thanks to him for sharing his idea! This implementation reads the pictures from a USB flash disk and extends the functionality with a remote shutter function for Nikon DSLR cameras and two buttons to select a picture.
Part List
To create a LightScythe you need the following parts
- 2 Meter LED Stripe (http://www.adafruit.com/products/306)
- Arduino/Seeeduino (http://www.seeedstudio.com/depot/seeeduino-v22-atmega-328p-p-669.html)
- VDIP1 (http://www.watterott.com/de/VDIP1)
- A powerful 5V source (I opted to use my 11.1V LiPo with a DC-DC converter)
- LiPo 2650mAh (http://www.hobbyking.com/hobbycity/store/uh_viewItem.asp?idproduct=8915)
- DC-DC converter (http://ch.farnell.com/jsp/search/productdetail.jsp?SKU=1705263)
- High Power IR LED (http://ch.farnell.com/jsp/search/productdetail.jsp?SKU=1779662)
- Some switches, transistors and resistors (see Schema)
Hardware
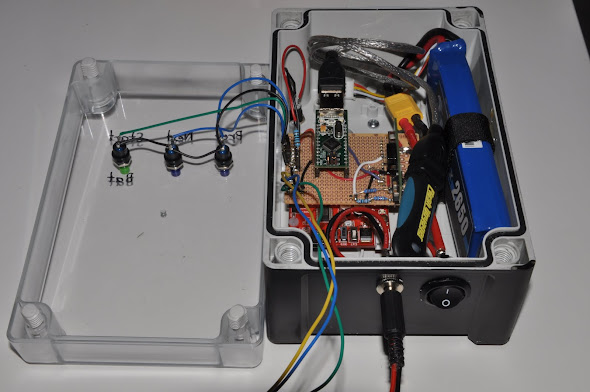 |
| Aus LightScythe Hardware |
You can download my Schema here. The connection of the LightScythe is from ladyada.net.
Software
My LightScythe Software is written using the default Arduino IDE. I’m using some libraries:
- Multi Camera IR Control from Sebastian Setz
- HL1606-LED-Strip-PWM from Limor Fried
- NewSoftSerial from Mikal Hart
You can find the source code of the Arduino Firmware on Github:
https://github.com/falstaff84/LightScythe/
Install the libraries above and download the Firmware from the Github Website using the Download button on the Top-Right side. Unpack the ZIP file to your sketch folder and download the firmware.
Pictures
You can created pictures using any software. But you need to store your picture in a specific Format:
- Filename: Number + “.bmp” (e.g. 1.bmp)
- 4-Bit indexed BMP-File (8-Bit is WIP)
- The pictures need to be rotated counter clockwise by 90°
The rotation is needed because the BMP file format saves the picture column-wise. But the LightScythe Firmware needs the picture row-wise. The CPU would need to much RAM to turn the picture itself, and it would make the firmware also more complicated.
I use a specific Color palette which only contains the color my LightScythe supports. I use GIMP to create the pictures and created a 3-Bit palette. I Usually do the following steps:
- Create a new Picture (Height 64 Pixel, Width whatever needed)
- Draw/Paste something
- Picture => Transformation => 90° Counter Clockwise
- Picture => Mode => Indexed… => (Import/Choose the LightScythe 3-Bit Color palette)
- Save the picture as Bitmap file (ending *.bmp)
Copy the picture on a USB flash disk. The flash disk need to be formated with a FAT-Filesystem. You should make sure you don’t have any important files on your USB flash disk! I do not take responsibility for data loss! 🙂
Hi I’m Jade
I’m trying to figure how to build one of theses I have most of the parts on order but I relay need to figure out how the parts go together I’m not great with electronics but I understand most things so any help you can offer would be great .
Im hoping to use in as part of a final year project for my degree again any help you can offer would be great .
Regards
Jade Stewart